Hello all! Year 2010 has been full of surprises and this one is another one that I would like to share with everyone : ) I was invited by
National Arts Council Singapore and
Original Media Pte Ltd to be part of the upcoming
NOISE House Exhibition 2010 happening in August! For the upcoming event, there are 2 teams of commissioned artists; a team designing Crates and the other team designing Bottles. Team Crates would have their works crafted into shelving units and Team Bottles would have their bottles made into a chandelier! And yes, I'm in Team Bottles, and it's 10 glass bottles to work on! So here's a simple tutorial on how to design and customize your own glass bottles, and turn them into gorgeous light chandeliers : )
We will need:
1. Glass Bottles (the ones that were provided were from
IKEA)
2. Glass paint (I'm using
Marabu Decor Glass Paint)
3. Permanent Markers
4. Varnish
5. Brushes
6. Other miscellaneous materials

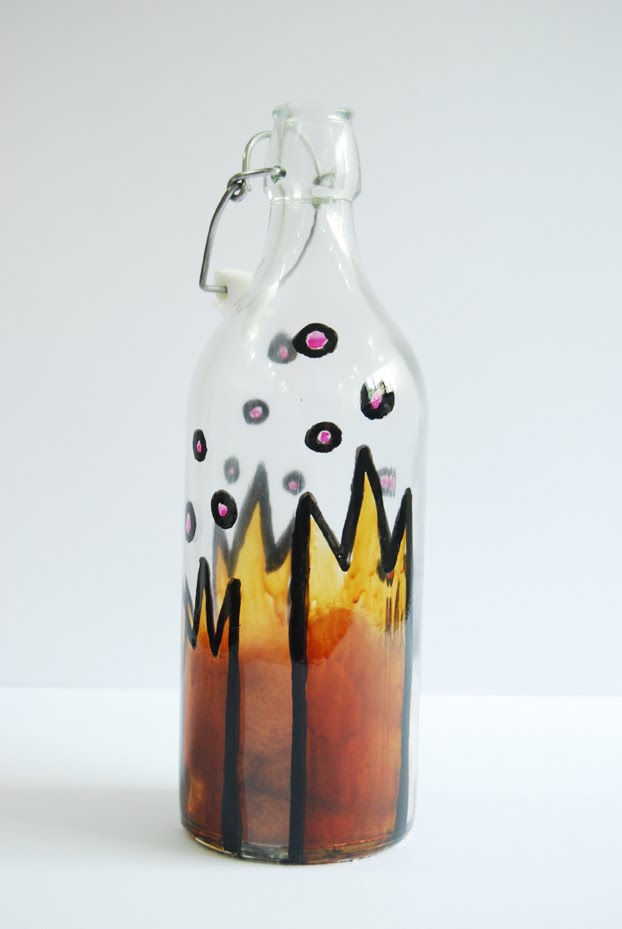
For the purpose of this project, I have to use a paint that will allow the light stick to shine through, in order for it to be a sufficient source of lighting. So before I started painting, I tested out different paints on the glass bottle. Below is an image of the different paints and markers I used. Acrylic doesn't stay well on glass, and neither does the light pass through it well. My poster paint Sharpie Poster Marker doesn't stick very well either (you probably need to use the permanent ink ones). Glass paint turned out to be the solution as it stays well on glass (doesn't rub off easily) and it allows light to shine through.

How to paint: I first used black glass paint to outline the drawing, and then waited for about half an hour to start filling in the gaps with other colours. I used a brush to paint. It's a little slippery, especially painting on a curved surface, so you have to keep practicing to get used to it. If you happen to have painted wrongly or want to take off the paint, just use good old nail polish remover. It works like magic! Let dry and paint over the second coat if desired. Dry again for about an hour and then varnish with Marabu Colourless Varnish. Be careful while varnishing, and try to varnish only on the areas where you painted the bottle, because the varnish tends to leave a colourless stain if you apply it on the unpainted areas.
For this set of 10 bottles, I decided to go with a cute and simple design that represents some of the different elements of nature, in my own warped version of course : ) Here are the 10 bottles:


I hope you like them : ) As you can see, I used other materials to fill in the bottles. I have things like crumpled coloured paper, felt, cotton wool and natural dried moss. So get creative and figure out how you'd like to design your bottles.. you can use any materials you want! Here are the 10 individual bottles for you to have a closer view. Enjoy : )


Oh yes, I will be posting pictures of how the glass bottles turn out to look like with light sticks in it, and also show you the other awesome bottle and crate designs done by other commissioned artists. So do stay tuned for upcoming updates about the Glass Bottle Chandeliers in August!
--Contributors--
Andy


![[Technabob]](http://i97.photobucket.com/albums/l217/lOOling/technabob_small.jpg)


.JPG)


